Automated iOS Screenshots with XCTestplan
Taking App Screenshots these day can be a daunting task, especially if your App is universal and supports multiple languages. If your app only supports four languages and both iPad and iPhone, four screenshots quickly result in 64 unique that have to be taken. Certainly a task that should be automated, to save time whenever screenshots change.
XCTestplan was released in Xcode 11. It allows us to specify multiple configuration for our test cases. Currently the configurations mostly apply to how the tests should be run, including what application language to use. In this post I will go over how we can leverage that to automate our app screenshots.
Setup XCTestplan
I highly recommend setting up a separate UITests target for these automated screenshots, especially if you don’t want to run your regular UI tests with these configurations. To do so you’ll use the File > New > Target option and select a new UI Testing Bundle.
Once that is done, we’ll want to to add a new XCTestplan to this target. We can either use the Xcode menu Product > Test Plan > New Test Plan or from the scheme editor we can select the Convert to use Test Plans option. If you chose the former you want to make sure to add the new target under the Test tab.
Since we only want to configure the language setting we can leave all Shared Settings untouched, and simply add a new configuration for each language we support. Here is what this would look like for an app that supports three languages:
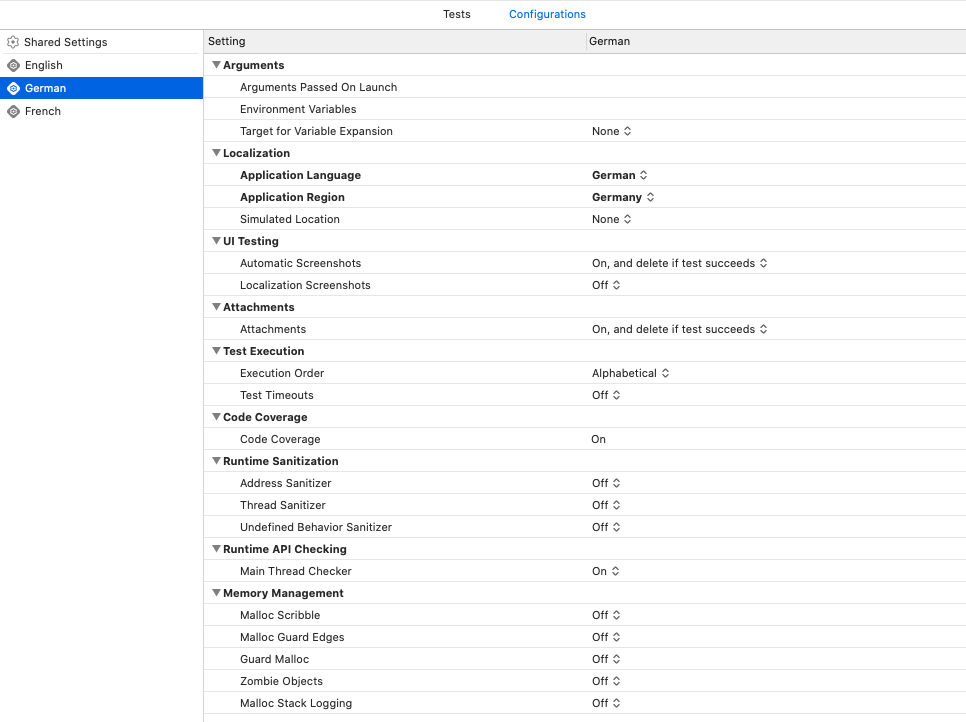
And that’s all we need to setup our XCTestplan.
Automate Screenshots
The UI tests for your screenshots will not differ much from your regular UI tests, besides that you will occasionally add a screenshot attachment. You can also add XCTAssert checks if you want your tests to fail early when things go unexpected. Another important note is that you might need to add waitForExpectations as your UI may not be ready when you try to take a screenshot. This could involve waiting for a keyboard to appear, or a pop animation to finish. Below is an example test case with all the necessary helper methods:
func testScreenshots() {
    let app = XCUIApplication()
    let searchButton = app.buttons["search"]
    searchButton.tap()

    let keyboard = app.keyboards.firstMatch
    waitForExistence(of: keyboard)
    app.typeText("Cupertino")
    add(takePromoShot(name: "Search"))

    let firstResult = app.cells.firstMatch
    firstResult.tap()
    waitForDisappearance(of: keyboard)
    add(takePromoShot(name: "Result"))
}
func waitForExistence(of element: XCUIElement) {
	let predicate = NSPredicate(format: "exists == TRUE")
	expectation(for: predicate, evaluatedWith: element, handler: nil)
	waitForExpectations(timeout: 5.0, handler: nil)
}

func waitForDisappearance(of element: XCUIElement) {
	let predicate = NSPredicate(format: "exists == FALSE")
	expectation(for: predicate, evaluatedWith: element, handler: nil)
	waitForExpectations(timeout: 5.0, handler: nil)
}
func takePromoShot(name: String) -> XCTAttachment {
	let lang = Locale.preferredLanguages[0]
	let screenshot = XCUIScreen.main.screenshot()
	let attachment = XCTAttachment(screenshot: screenshot)
	attachment.lifetime = .keepAlways
	attachment.name = "\(lang)-\(name)"
	return attachment
}
Let’s focus on the last helper method a little more. In that function we take in a name for our screenshot, prepend the language identifier, take a screenshot and then return a new XCTAttachment with the lifetime of .keepAlways. The lifetime is important as this ensures that our screenshots will persist after the test has finished. UI tests regularly take screenshots, these are extremely helpful when trying to determine why and when your tests fail but are discarded by default when tests succeed. So when our testScreenshots succeed you will be left with only the promotional screenshots.
Clean Status Bar
Most app developers prefer their screenshots to have a clean status bar (9:41 AM, full signal, etc), and with Xcode 11 this is now even easier. There is a new utility within xcrun simctl status_bar that allows us to override these values. I normally add this as a Build Phase in the screenshots UI test target:
xcrun simctl status_bar booted override --time 9:41 --operatorName ' ' --cellularMode active --cellularBar 4 --wifiBars 3 --batteryState charged
This will set the status bar as it appears in Apple’s marketing images. Unfortunately this does not work on a real device, only on simulators. Another caveat is that the simulator you want to use, has to be booted before you run the screenshot tests.
Extracting Screenshots
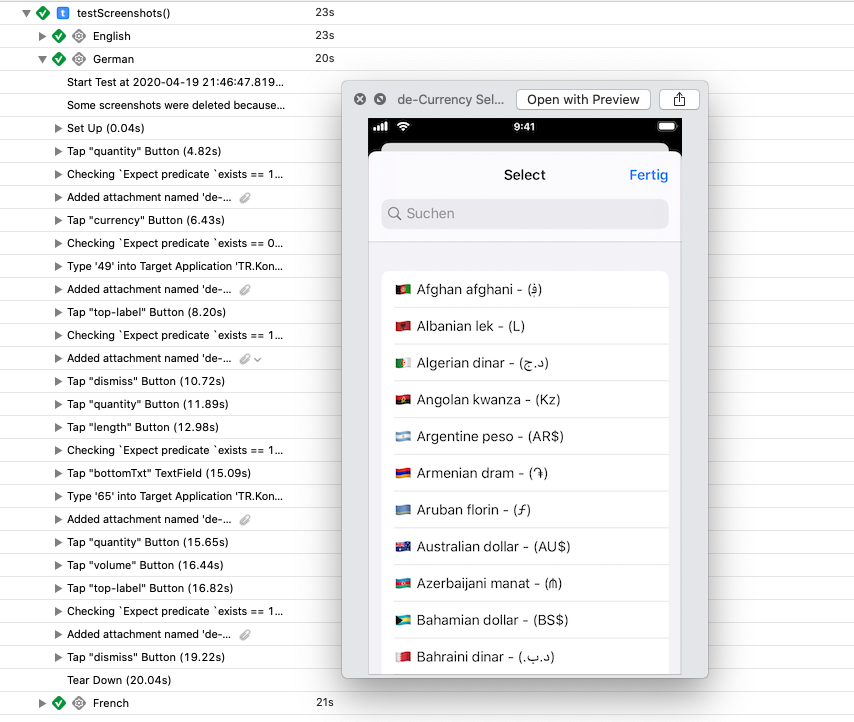
Now we are at a point where we can run our screenshot UI test. Once those have passed we can look at the results in the Report Navigator within Xcode. Here you should see your test, which expands in all the different language configurations and then into the test procedure. Our screenshot attachments are marked with little paperclips and we can open them with QuickLook.
It can get very tedious to save each screenshot individually, especially when we have many languages. Unfortunately these attachments do not exists as png or jpg files within our test results, another change that came with Xcode 11. However we can parse the test results and find json that leads us to the actual attachments and extract these. The best way to do so is with xcparse. It can be installed through homebrew and we can then extract our screenshots as follows:
xcparse screenshots /path/to/Test.xcresult /path/to/outputDirectory
There are additional flags you can set if you want them to be grouped by device, OS, or even test plan configuration. But since we already prefix them with the language identifier they can easily be ordered by name.
Summary
This approach of automating screenshots already paid off and saved me valuable time, especially when new device dimensions become required for screenshots, or when major parts of the UI change. At WWDC20 I would really like to see devices added as part of the XCTestplan configurations, until then we have to select these manually, or use a script that iterates through the ones that are required for AppStore screenshots.
Next Post: