Building Widgets for iOS 14
This post discusses APIs and Software that are currently in beta and may change.
Apple just introduced iOS 14 and one of the major changes are Widgets coming to the iPhone home screen. This will be a flagship feature and users will expect your app to offer a Widget as well. So let’s look at how you can build one for your own app. Note: Widgets can only be built with SwiftUI as they are archived to save performance. This also means you are unable to use UIKit views, even if they are wrapped in UIViewRepresentbale.
Widget Extension
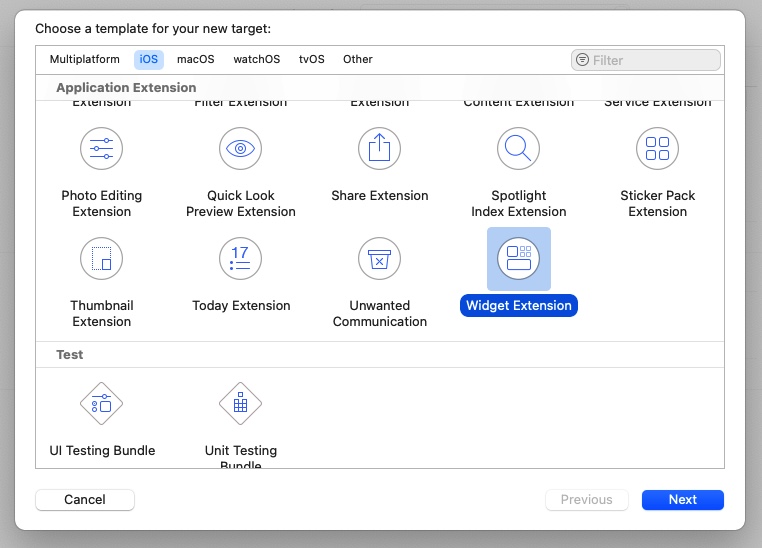
First off we need to add a new extension to our app. With Xcode 12 we can find a new Widget extension that will give us the building blocks to create our Widget.
When creating the extension you can choose to include Intents, which allow your user to choose the data that is being displayed. The Weather widget for example let’s users choose which of their saved locations or if the current location should be displayed within the Widget. For this post I will focus on a static Widget that does not take Intent variables.
Timeline
The first thing we need is a TimelineEntry type. This protocol has two requirements date and relevance, even though the latter one has a default implementation of nil. Additionally you should associate the data that you want to display, or at the very least the data that allows you to fetch what you want to display.
struct FlightEntry: TimelineEntry {
    public let date: Date
    public let flight: Flight
    public var relevance: TimelineEntryRelevance?
}
All of these need to be public as the system that is interacting with your widget is not part of your app module.
Next we create a TimelineProvider that is responsible for getting the data and establishes a timeline on which your Widget will be updated.
struct Provider: TimelineProvider {
    public func snapshot(with context: Context, completion: @escaping (FlightEntry) -> ()) {
        let flight = TripManager.shared.upcomingFlight()
        let entry = FlightEntry(date: Date(), flight: flight, relevance: .init(score: flight.departureDate.isToday ? 50 : 500))
        completion(entry)
    }

    public func timeline(with context: Context, completion: @escaping (Timeline<Entry>) -> ()) {
        let flight = TripManager.shared.upcomingFlight()
        let currentDate = Date()

        let minute: TimeInterval = 60
        let hour: TimeInterval = minute * 60

        let entries: [FlightEntry] = (0...5).map { offset in
            if flight.departureDate.isToday {
                let entryDate = currentDate.addingTimeInterval(Double(offset) * 10 * minute)
                return FlightEntry(date: entryDate, flight: flight, relevance: .init(score: 50))
            } else {
                let entryDate = currentDate.addingTimeInterval(Double(offset) * hour)
                return FlightEntry(date: entryDate, flight: flight, relevance: .init(score: 500))
            }
        }

        let timeline = Timeline(entries: entries, policy: .atEnd)
        completion(timeline)
    }
}
Let’s dive deeper into what these two methods do. First we have snapshot which is used when the Widget is first added to the home screen or if presented as a preview. Conveniently the context has a isPreview flag that allows us to check. This is important because the method will have to return very fast, so don’t fetch data from a server for the preview, but rather provide the most current data you have locally.
Second we have the timeline method which will be called to generate a timeline on which your Widget is updated. In the example above I’m providing 6 timeline entries, where the date and relevance depends on how important the data is. If the users upcoming flight departs today I want to update the Widget every 10 minutes and provide a high relevance so that it will be moved to the top in the Smart Stack. If the upcoming flight is further in the future I’m fine with updating once an hour and being displayed further to the end of the Smart Stack.
Widget UI
Finally we need to provide UI for our Widget, based on the entry provided by the TimelineProvider. Here we’ll be using some of the brand new features of Swift 5.3:
@main
struct NextFlightWidget: Widget {
private let kind: String = "next_flight_widget"
public var body: some WidgetConfiguration {
StaticConfiguration(kind: kind, provider: Provider(), placeholder: PlaceholderView()) { entry in
NextFlightWidgetView(flight: entry.flight)
}
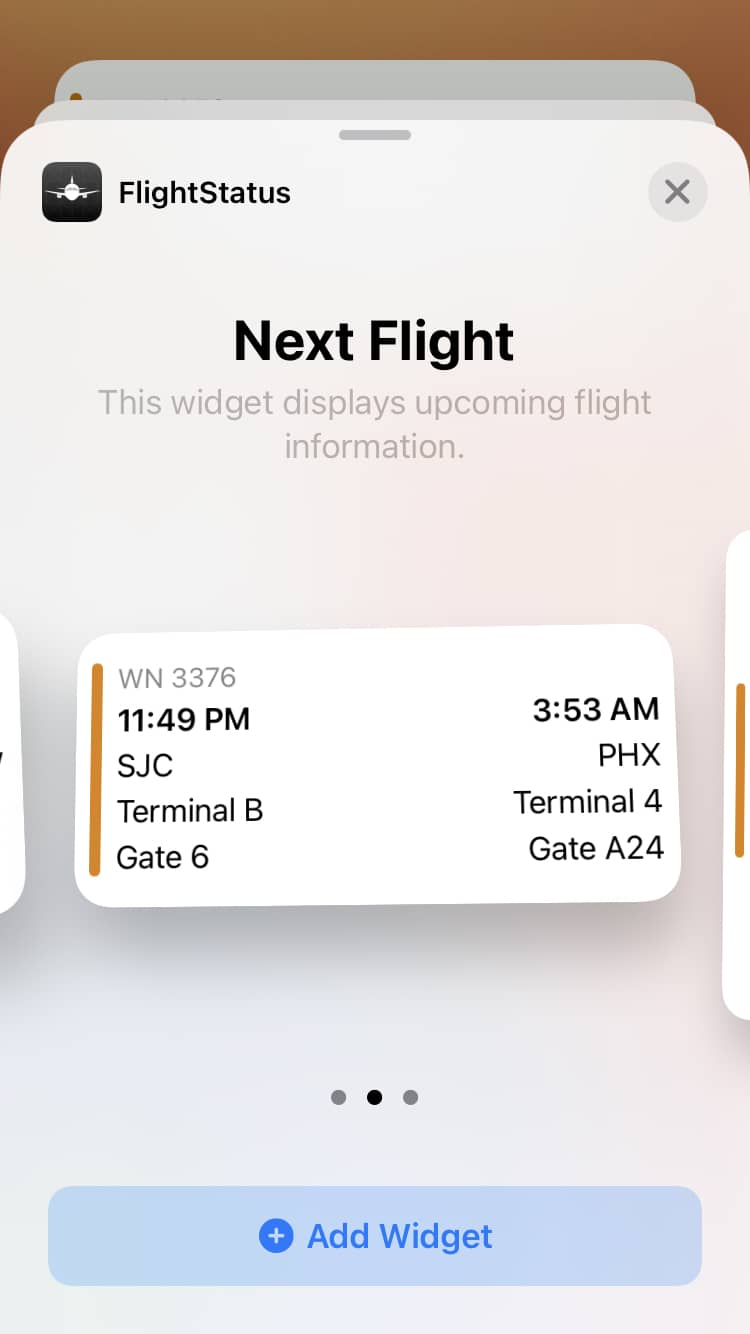
.configurationDisplayName("Next Flight")
.description("This widget displays upcoming flight information.")
.supportedFamilies([.systemSmall, .systemMedium, .systemLarge])
}
}
We use the Widget protocol and the @main attribute to let the System know where to get our Widget from. We then use a StaticConfiguration and our previously created Provider struct to supply a FlightEntry to us. Furthermore we add a Display Name and Description for the Widget, these will be displayed in the system UI when users first add your Widget as seen below. You are also able to provide the supported families, in my case I’m supporting all three: small, medium, and large.
Then we need to create the actual View. Here I’m using the brand new @ViewBuilder to switch on the Widget Family to provide a unique view for each:
struct NextFlightWidgetView: View {
    @Environment(\.widgetFamily) var family: WidgetFamily
    let flight: Flight

    @ViewBuilder
    var body: some View {
        let flightViewModel = FlightViewModel(from: flight)
        switch family {
        case .systemSmall: SmallFlightWidgetView(viewModel: flightViewModel)
        case .systemMedium: MediumFlightWidgetView(viewModel: flightViewModel)
        case .systemLarge: LargeFlightWidgetView(viewModel: flightViewModel)
        @unknown default: preconditionFailure("Unknown Widget family: \(family)")
        }
    }
}
Caveats
Widget views have to be pure SwiftUI, so you’re not able to wrap UIKit views in UIViewRepresentable otherwise you’ll encounter crashes when the system tries to create your view from an archive.
Furthermore not all SwiftUI views can be used within Widgets, that is due to the static nature and the use of KeyArchiver to render these. Currently these are not (yet) document, but was told in a lab that documentation will be coming soon. Until then here is a (incomplete) list of views that CANNOT be used in Widgets:
- List
- ScrollView
- Switches
- ProgressView
Other dynamic views like the new Map component in SwiftUI need to be made static. We can achieve this with the help of MKMapSnapshotter.
Interaction
Let’s talk about how you can open your app at the right point after a user taps on your Widget. SwiftUI now has two new properties that we can make use of for this in particular. First the widgetURL modifier:
.widgetURL(URL(string: "flight-status://widget/\(flight.ID)"))
With this modifier applied to our Widget view we can specify a deep link URL that will be passed to our app. In my case I’m passing the flight ID in order to open the app with the next flight details. Only one widgetURL can exist per view hierarchy, and this is the only way we can specify links for small Widgets, as all other will be ignored. For medium and large Widgets we can have multiple tap target, each of which is associated with its own URL through the new Link struct:
Link(destination: URL(string: "flight-status://widget/\(flight.ID)")!) {
    // Your View here
}
Note: During the sessions and the lab Apple was very clear that Widgets should not be used as a simple App Launcher, but rather offer valuable and glanceable information.
Previews
In order to properly preview our Widgets within Xcode 12, we now have access to a new WidgetPreviewContext here we can define what size family we want to preview:
struct WidgetPreviews: PreviewProvider {
    static var previews: some View {
        Group {
            SmallFlightWidgetView(viewModel: testViewModel())
                .previewContext(WidgetPreviewContext(family: .systemSmall))
            MediumFlightWidgetView(viewModel: testViewModel())
                .previewContext(WidgetPreviewContext(family: .systemMedium))
            LargeFlightWidgetView(viewModel: testViewModel())
                .previewContext(WidgetPreviewContext(family: .systemLarge))
        }
    }
}
Here is what the UI of adding your Widget will then look like:
Next Post: